
From Me To You

Today's card combines ink blending, embossing, die-cutting, and foiling to create a beautiful spring card.
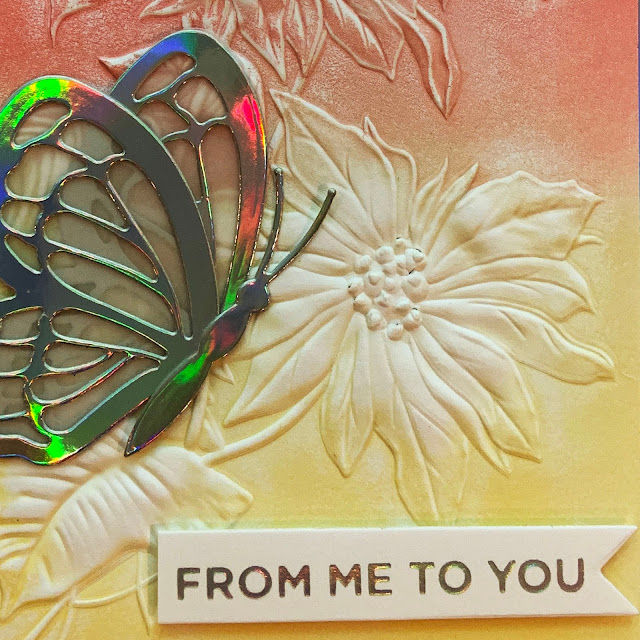
Three colors of ink were blended on the smooth side of the Sizzix Tim Holtz Poinsettia 3-D Texture Fades embossing folder.  This allowed for the embossed portion of the card panel to remain white amongst a soft ink blended background.


I die-cut a butterfly using a butterfly cutting template set from Momenta.  The holographic details of the butterfly were glued to the butterfly wings which were cut from vellum.

The sentiment was foiled in Prism hot foil using the Spellbinders Glimmer Hot Foil System.  I cut a banner around the sentiment and adhered the butterfly and the sentiment to the card panel.  I trimmed the embossed card panel slightly on each side and attached it to a holographic cardstock panel.  This was glued to a white card base.


This was a quick and easy card to make, but I love the soft colors and the overall elegance of the card.

From Me To You
Supplies:
  • Accent Opaque White Cardstock 100lb
  • Sizzix Tim Holtz Poinsettia 3-D Texture Fades
  • Distress Oxide Inks - Worn Lipstick, Bundled Sage, and Scattered Straw
  • Momenta 8 PC Butterfly Cutting Templates
  • Park Lane 6x6 Holographic Paper Pad
  • Vellum
  • Spellbinders Glimmer Hot Foil System
  • SpelbindersMore Sentiments Glimmer Plates
  • Spellbinders Prism Glimmer Hot Foil

Comments

Popular posts from this blog

Tim Holtz Spencer Halloween Card

I can't get enough of Tim Holtz's Colorize Spencer die set.  The detail and dimension of this image is absolutely amazing.  Today's card features Spencer, 3-D embossing folders, and a few other Tim Holtz Halloween dies sets. The main card panel was made by embossing a piece of silver foil cardstock using the Sizzix 3-D Textured Impressions Pinwheel embossing folder.  I watered down a few drops of black acrylic paint and used a paint brush to brush the paint onto the embossed panel.  I let the paint dry for about a minute and then took a paper towel to rub off the excess paint.  I adhered this panel to a black card base. The smaller card panel was made by embossing a piece of black cardstock with the Tim Holtz Sizzix 3-D Texture Fades Mini Cobblestone embossing folder.  I added a few drops of Sterling Distress Foundry Wax to a craft mat and used my finger to apply the Foundry Wax to the embossed panel.  I added a black matte behind this emboss...

I'd Cross the Ocean For You

I just received the Seas the Day stamp set by Dare 2B Artzy and I couldn't wait to use the images and sentiments to make some ocean-themed cards.   I started out by stamping the manatee and shells and colored them with Copic markers.  For the card front, I used Pixie Spray on the back of a mermaid scales stencil and adhered it to a piece of Bristol smooth cardstock.  I blended 3 colors of blue Distress Oxide Inks to make it look like the ocean water was getting lighter near the surface.  To add a little bit of sparkle to the water, I splattered some glitter ink on the stenciled card front. I decided to make this a shaker card, so I used a scallop square die to cut a window out of the center of the card front.  A piece of acetate was glued to the back of this window.  I blended Tumbled Glass Distress Oxide Ink on the white card base.  A sequence mixture was made using blue, white, and iridescent sequence.  I glued a few of the sequence pieces ...

Hero Arts Citrus Cards

Today I had fun playing with the Hero Arts Fresh Citrus Bold Prints background stamp and the Hero Arts Zest Wishes Stamp Set to create these fun and fresh set of cards. I started by creating the backgrounds.  I used white cardstock and stamped it with the background stamp using VersaMark Ink.  I heat embossed the panels with white embossing powder.  Then, I used a foam blending tool and blended Scattered Straw, Squeezed Lemonade, and Twisted Citron Tim Holtz Distress Oxide Inks to ink the card panels.  For some panels, I used only one ink and other panels I used a combination of all the inks.  I cut the inked backgrounds down to 4" x 5.25" and matte each panel on a black card base.   For one card, I used the excess strips from when I cut down the inked panels, and adhered these strips to a black card panel, leaving a little of the black background showing in between each of the strips. I stamped all the citrus fruits, leaves, flowers, and branches on w...