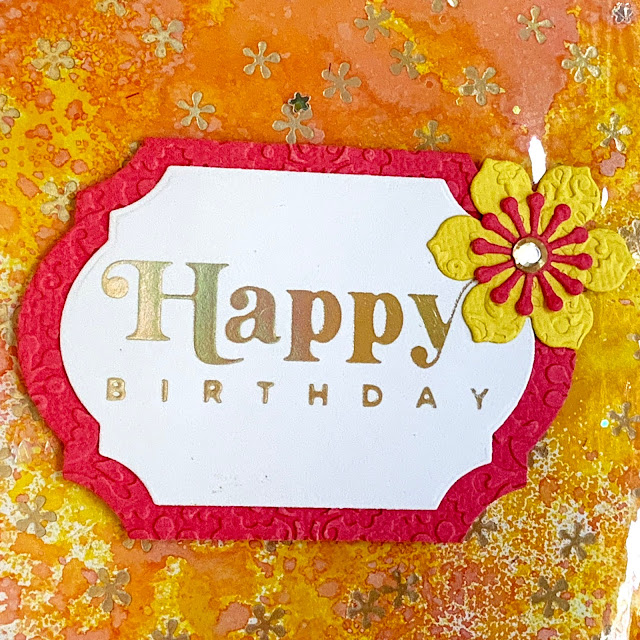
Glimmer Hot Foil Birthday Cards

Today's cards are part of my stash-busting series.  This is where I look around my craft room and grab a bunch of supplies that I haven't yet had the chance to use.  The results yielded two glimmer hot foiled birthday cards.
I used the smooshing technique to apply Mustard Seed and Worn Lipstick Distress Oxide inks onto white card panels.  After the panels were dry, I used the Spellbinders Glimmer Hot Foil System along with the Scattered Flowers and Diamonetta Background Glimmer plates to add Aura Glimmer Hot foil to the card panels.   The card panels were mounted onto pink cardstock.  I used the same Aura foil to glimmer the Happy Birthday sentiment onto white cardstock.  


I cut the sentiment using a Momenta nesting border die.  I used a slightly larger border die to cut a sentiment border from the pink cardstock.  I cut pink and yellow flowers using the Sizzix Spring Things die set.  I ran the flowers and sentiment border through the Project Life Adventure embossing folder.  I also die-cut white cardstock using one of the backgrounds from the Sizzix Creative Backgrounds die set.


On the Diamonetta glimmered background, I adhered the white border to the right side of the card and used foam tape to adhere the layered sentiment so that it slightly overlapped the white die-cut border.  I layered up the embossed flowers and popped them up with foam tape on the right side of the sentiment.  I added some adhesive bling to the centers of the flowers.


For the shaker card, I wrapped the card panel using a piece of plastic packaging and adhered the packing to the back of the card panel using double-sided adhesive.  Before adhering the plastic to the top of the card, I shook some pink, white, and yellow glitter down the front of the card.  I used double-sided tape to adhere the layered sentiment and flower to the front of the card.


The thin shaker card is an ideal way to use up the glitter in your stash and is perfect for mailing since it has very little dimension.  I also love the dimension that the embossing folder gave to the flowers.  


Take a look around your craft room and see what you can create from those neglected supplies.  Stay tuned for more stash-busting projects.

Glimmer Hot Foil Birthday Cards
Supplies:
  • Accent Opaque White Cardstock 100lb
  • Recollections Cardstock - White
  • AC Cardstock - Fireberry and Lemon
  • Distress Oxide Inks - Mustard Seed and Worn Lipstick
  • Spellbinders Glimmer Hot Foil System
  • Spellbinders Glimmer Hot Foil - Aura
  • Spellbinders Glimmer Plates - Scattered Flowers Background and Diamonetta Background
  • Spellbinders Scalloped Rectangle Glimmer Kit of the Month - February 2021
  • Momenta Nested Large Border Cutting Templates
  • Sizzix Thinlits - Creative Backgrounds
  • Sizzix Thinlits - Spring Things
  • Project Life Adventure Embossing Folders
  • Recollections Bling Stickers
  • Recollections Memory Explosion Box Assorted Glitter Set
  • Foam Tape
  • Double-Sided Tape

Comments

Popular posts from this blog

Tim Holtz Spencer Halloween Card

I can't get enough of Tim Holtz's Colorize Spencer die set.  The detail and dimension of this image is absolutely amazing.  Today's card features Spencer, 3-D embossing folders, and a few other Tim Holtz Halloween dies sets. The main card panel was made by embossing a piece of silver foil cardstock using the Sizzix 3-D Textured Impressions Pinwheel embossing folder.  I watered down a few drops of black acrylic paint and used a paint brush to brush the paint onto the embossed panel.  I let the paint dry for about a minute and then took a paper towel to rub off the excess paint.  I adhered this panel to a black card base. The smaller card panel was made by embossing a piece of black cardstock with the Tim Holtz Sizzix 3-D Texture Fades Mini Cobblestone embossing folder.  I added a few drops of Sterling Distress Foundry Wax to a craft mat and used my finger to apply the Foundry Wax to the embossed panel.  I added a black matte behind this emboss...

Hello Spring 2022

I love making spring cards.  I get so excited to mix and match the many die sets I have accumulated throughout the year.  Today's cards feature die cut shapes from a variety of die sets.  I created both a vertical and horizontal card layout, changing out the focal image on each of the cards. I started by cutting one of the Sizzix Creative Background dies from the side of a white card panel.  I trimmed a little off each edge and layered it onto a pink cardstock panel.  I cut some grass from light green cardstock using the the grass die from the Spellbinders March 2021 Large Die of the Month Set.  Using the same die set, I cut the sentiment "Hello Spring" from lavender cardstock. You can't have a spring card without lots of flowers, so I scavenged through my scraps of paper to find colors that would coordinate well together.  I used multiple Sizzix Thinlits die sets to cut flowers, foliage, and branches from the scraps of colored cardstock.  I also ...

Pumpkin Picking

Today's fun Halloween card features the Tim Holtz Colorize Pumpkinhead Colorize die set and Distress Mica Stains. I started by spraying a water color panel with Hocus Pocus, Jack-O-Lantern, and Empty Tomb Halloween Distress Mica Stains.  For the moon, I die cut a circle out of water color paper. I ink smooshed Antique Linen and Weathered Wood Distress Oxide Inks onto a craft mat and sprayed them with water.  I pushed the circle into the inks and dabbed off the excess ink and water with a paper towel.  I inked the edges of the moon with Black Soot Distress Oxide Ink.  I adhered the moon to the water color panel and added a black bat to the top of the moon. Next, I die cut several trees, bats, and fences out of black cardstock.  I also die cut a couple of fences from silver foil cardstock.  I adhered the trees to both sides of the card panel.  I slightly offset the silver foiled fence from the black fence and adhered the fence pieces to the bottom of the...