
Daisy Delight

Today's card features the Spellbinders Daisy Delight Garden Shutters A2 Card Base die set and the
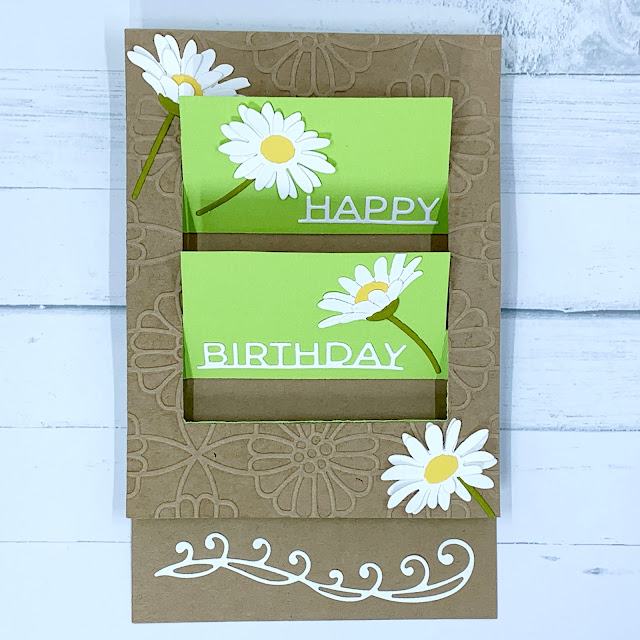
Spellbinders Sketched Floral Embossing Folder of the Month for February 2022.  I do not own any daisy dies so I couldn't wait to create using this die set.


I started by cutting two A2 sized card panels out of Kraft cardstock.  I used the included die to cut out the center out of one of these panels.  I then embossed this panel with the Spellbinders Sketched Floral embossing folder.  I cut a third A2 sized panel from bright green cardstock and used the kinetic die to cut out two shutters from this panel following the directions on the Spellbinders website.  I assembled the card following the directions from the Spellbinders website.


To decorate the front of the card, I cut two window panels from yellow cardstock and two lattice panels from white cardstock.  I glued the white lattice panels to the yellow window panels and adhered these to the front of the card.  I die cut the daisy petals out of white cardstock, centers from yellow cardstock, and stems out of a darker green cardstock.  I assembled five of the flowers and glued them to the front of the card.


For the inside of the card, I glued a daisy to each of the windows.  I cut the sentiment "Happy Birthday" and glued it to the inside windows.  The very bottom of the card looked a little plain when the card is opened to reveal the inside, so I cut a Momenta flourish border out of white cardstock and adhered it to the bottom of the inside of the card.


This die set is very versatile and I can't wait to use it to create a variety of kinetic cards

Daisy Delight
Supplies:
  • Accent Opaque White Cardstock 100lb
  • Recollections Cardstock - Kraft, White, Bright Green, and Yellow
  • Spellbinders Daisy Delight Garden Shutters A2 Card Base
  • Spellbinders Embossing Folder of the Month Feb 2022 - Sketched Floral
  • Momenta Cutting Templates - Flourish Border
  • Directions for Assembling the Garden Shutters Card

Comments

Popular posts from this blog

Lost in the Inky Darkness

Today's card features a few of the new Tim Holtz Sizzix and Ranger Halloween products.  I could not wait to use the Tim Holtz Skulls 3-D Texture Fades embossing folder and combine it with Distress inks and spray stains. I started by inking the flat side of the embossing folder with Black Soot Distress Archival Ink.  I sprayed a panel of water color paper with water and carefully placed this paper into the embossing folder. I ran the embossing folder through my Sizzix Big Shot 3 times. I took the embossed panel out of the embossing folder and cleaned the embossing folder with StazOn All-Purpose Stamp Cleaner. Next, I sprayed the panel with Tim Holtz Decayed Distress Mica Stain.  This gave it a green tinge with a hint of sparkle.  I decided to seal the card panel by dipping a foam blending pad into Distress Micro Glaze and dabbing this onto the card panel.  I glued a black cardstock matte behind the embossed panel and adhered it to a white card base. For the sentiment, I used the &qu

Tim Holtz Spencer Halloween Card

I can't get enough of Tim Holtz's Colorize Spencer die set.  The detail and dimension of this image is absolutely amazing.  Today's card features Spencer, 3-D embossing folders, and a few other Tim Holtz Halloween dies sets. The main card panel was made by embossing a piece of silver foil cardstock using the Sizzix 3-D Textured Impressions Pinwheel embossing folder.  I watered down a few drops of black acrylic paint and used a paint brush to brush the paint onto the embossed panel.  I let the paint dry for about a minute and then took a paper towel to rub off the excess paint.  I adhered this panel to a black card base. The smaller card panel was made by embossing a piece of black cardstock with the Tim Holtz Sizzix 3-D Texture Fades Mini Cobblestone embossing folder.  I added a few drops of Sterling Distress Foundry Wax to a craft mat and used my finger to apply the Foundry Wax to the embossed panel.  I added a black matte behind this embossed panel and adhered it at an an

First Day of School

Today's layout was inspired by @christys_beautiful_life 30 Days of Sketches Round 8, Day 3.  I decided to focus the layout on a photo of this year's first day of school. The layout has several sketched circles.  I decided to break out the sewing machine and sew a few black circles using a variety of stitches.   The Scraptember challenge combined with this sketch was layering. So I grabbed the Simple Stories Smarty Pants collection and layered up a bunch of the branding strips and the patterned papers found on the journaling cards. I used the letter stickers from the collection to create the title.  I also used some of the stickers to embellish the title and photo, and also to create an embellishment cluster in the upper right corner of the layout.  To finish off the layout, I splattered it with black ink. I love the 30 Days of Sketches because it is a great way to use up older collections and challenges me to utilize techniques that I don't often use in my layouts. First Da