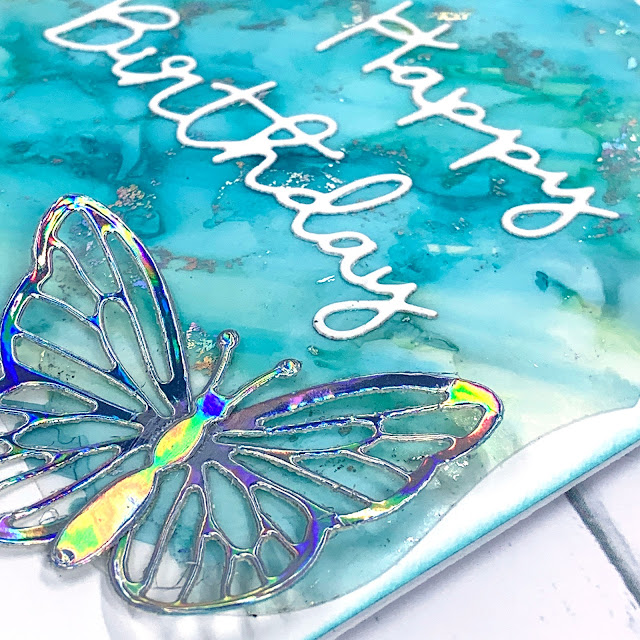
Alcohol Inked Butterfly Cards

Do you have lots of alcohol markers that you rarely use?  I have spent a lot of money on alcohol markers only to find that I really don't enjoy coloring stamped images.  Today's beautiful cards were created while experimenting with alternate ways I can use my alcohol markers.


To create the alcohol inked background shapes, I took a piece of Yupo white translucent paper that I purchased at Hobby Lobby and scribbled various shades of pink alcohol markers across the Yupo Paper.  Then, I dropped alcohol ink blending solution in various places on the paper.  I tipped the paper back and forth to allow the pink shades to mix and fill up most of the white space of the paper.  I repeated this process on another piece of Yupo paper using shades of blue alcohol markers.


I allowed the paper to dry until parts of the paper felt a little tacky.  Then, I took some of my foil scraps (left over from when I use my Spellbinders Glimmer machine), and placed the scraps on top of the inked surfaces.  I rubbed the foil onto the ink surfaces and slowly pealed it up to reveal small amounts of foil stuck to the tacky parts of the inked surfaces.  I repeated this several times until the surfaces were dry.  The small amount of foil resembles a stunning marbling effect.


I cut the Yupo paper using the largest die of the Spellbinders Essential Classic Label cutting dies.  I centered and adhered this shape on a white card base.  I die cut the "Happy Birthday" sentiment using the Spellbinders Our Favorite Font Sentiment Set and the sentiment "Hello" from the Spellbinders Simply Perfect Mix & Match Sentiment Set.  The white sentiments were adhered to the center of the inked shapes.  


I die cut the medium and small butterflies from holographic and gold foil cardstock using the Spellbinders Delicate Butterflies die set.  I adhered the butterflies to the top and bottom of the alcohol inked shapes.  On the pink card, I also die cut from gold cardstock a Tim Holtz wildflower and adhered it to the right of the sentiment.


To add a small frame around the card, I used a foam blending tool to add an inked border of Salvaged Patina Distress Oxide Ink around the blue card and Seedless Preserves Distress Oxide Ink around the pink card.


I am so excited to find a new use for all those alcohol markers that are gathering dust in my craft room.  I encourage you to give this technique a try.  Happy Crafting!

Alcohol Inked Butterfly Cards
Supplies:
  • Yupo White Translucent Paper
  • Accent Opaque White Cardstock 100lb
  • Alcohol Markers - various shades within the same color family
  • Alcohol Ink Blending Solution
  • Foil Scraps
  • Spellbinders Essential Classic Label Cutting Dies
  • Spellbinders Our Favorite Font Sentiment Set December 2019 Small Die of the Month
  • Spellbinders Simply Perfect Mix & Match Sentiments Cutting Dies
  • Spellbinders Delicate Butterflies
  • Tim Holtz Sizzix Thinlits Wildflower Stems #3
  • Recollections Cardstock - Gold Foil
  • Park Lane Holographic Cardstock

Comments

Popular posts from this blog

Tim Holtz Spencer Halloween Card

I can't get enough of Tim Holtz's Colorize Spencer die set.  The detail and dimension of this image is absolutely amazing.  Today's card features Spencer, 3-D embossing folders, and a few other Tim Holtz Halloween dies sets. The main card panel was made by embossing a piece of silver foil cardstock using the Sizzix 3-D Textured Impressions Pinwheel embossing folder.  I watered down a few drops of black acrylic paint and used a paint brush to brush the paint onto the embossed panel.  I let the paint dry for about a minute and then took a paper towel to rub off the excess paint.  I adhered this panel to a black card base. The smaller card panel was made by embossing a piece of black cardstock with the Tim Holtz Sizzix 3-D Texture Fades Mini Cobblestone embossing folder.  I added a few drops of Sterling Distress Foundry Wax to a craft mat and used my finger to apply the Foundry Wax to the embossed panel.  I added a black matte behind this emboss...

I'd Cross the Ocean For You

I just received the Seas the Day stamp set by Dare 2B Artzy and I couldn't wait to use the images and sentiments to make some ocean-themed cards.   I started out by stamping the manatee and shells and colored them with Copic markers.  For the card front, I used Pixie Spray on the back of a mermaid scales stencil and adhered it to a piece of Bristol smooth cardstock.  I blended 3 colors of blue Distress Oxide Inks to make it look like the ocean water was getting lighter near the surface.  To add a little bit of sparkle to the water, I splattered some glitter ink on the stenciled card front. I decided to make this a shaker card, so I used a scallop square die to cut a window out of the center of the card front.  A piece of acetate was glued to the back of this window.  I blended Tumbled Glass Distress Oxide Ink on the white card base.  A sequence mixture was made using blue, white, and iridescent sequence.  I glued a few of the sequence pieces ...

Ready Player One

Today's card is a fun virtual reality birthday card created in Cricut Design Space and features a vibrant title backed by an alcohol inked panel. A couple of years ago, my son and I read the book Ready Player One,  a science fiction book about humanity's use of virtual reality to escape the real world. Fast forward a few years and now he wants his own virtual reality headset for his birthday.  I created this card for him to celebrate our love for this book and to serve as a precursor of the birthday gift that was to come. While creating this card, I wore the movie T-Shirt I bought last year so I could mimic the movie title font and colors.  I needed an easy way to make the title out of rainbow colors so I placed a few colors of alcohol ink on a felt pad and swiped it across Yupo Paper.  I downloaded and installed the font used for the movie title and cut the title out of a black A2 card panel using Cricut Design Space.  I backed the black card panel with th...