
Real Life Adventures

Today's layout features a paper from the My Mind's Eye On Trend 2 collection by Jen Allyson and Project Life die-cut shapes from the Explore collection.  The colors and gold accents on the paper and the die-cut shapes paired perfectly together.
I used an 8.5 x 11 inch piece of gold foil cardstock and adhered the white side of the paper to the top 3/4 of the gold foil cardstock.  I found a coordinating striped paper in my stash and adhered it to the bottom of the gold foil cardstock.  


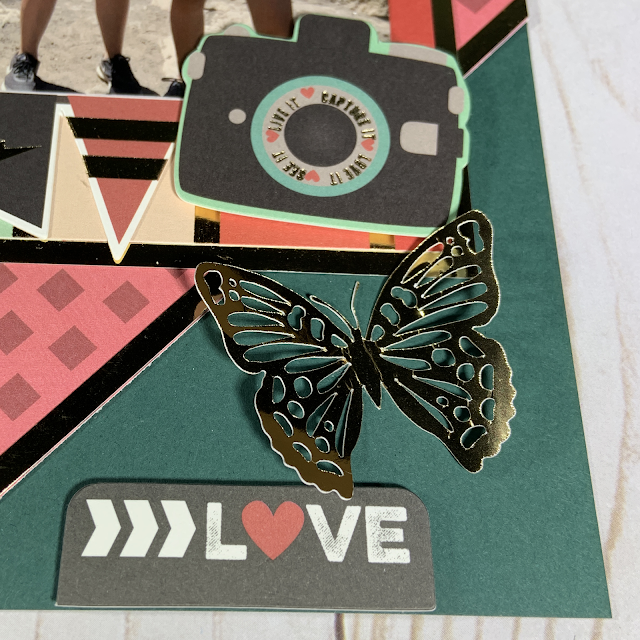
I took the pink side of the paper and turned it on its side and adhered it to the dark green cardstock.  I cut thin strips of the gold foil cardstock and adhered them to the edges of the pink paper.  I used my 12 x 12 Tonic guillotine trimmer to cut off the pink paper that was hanging over the edge of the green cardstock.


The 8.5 x 11 inch block of gold cardstock was glued to the center of the layout.  I placed the photo in the lower left corner of this block.  The Project Life die-cut shapes were placed in the upper left and lower right corners of the layout as well as in the middle of the page.  


I created a title using the Happy Birthday font downloaded from https://www.dafont.com/.  The font did not stand out well against the white paper, so I added a strip of dark green cardstock behind the title before adhering it to the page.  I also cut a butterfly from my Cricut in three different sizes and added one to each of the embellishment areas.  To add dimension to the page, I popped up a few of the die-cut shapes using thin foam tape and glued only the center of the butterflies to the page.


This has been one of my favorite papers to use for nature photos.  I was sad to have used up most of it on this layout.  The leftover scraps will be used to create journal cards and accents for a Project Life page that will contain more photos and memories of this day.

Real Life Adventures
Supplies:
  • My Mind's Eye On Trend 2 Paper
  • Project Life Die-Cut Shapes- Explore
  • Recollections Gold Foil Cardstock
  • Dark Green Cardstock
  • Cricut Butterfly (#MA7A34CA)
  • Font - Happy Birthday (https://www.dafont.com/happy-birthday-4.font)
  • Foam Tape

Comments

Popular posts from this blog

Lost in the Inky Darkness

Today's card features a few of the new Tim Holtz Sizzix and Ranger Halloween products.  I could not wait to use the Tim Holtz Skulls 3-D Texture Fades embossing folder and combine it with Distress inks and spray stains. I started by inking the flat side of the embossing folder with Black Soot Distress Archival Ink.  I sprayed a panel of water color paper with water and carefully placed this paper into the embossing folder. I ran the embossing folder through my Sizzix Big Shot 3 times. I took the embossed panel out of the embossing folder and cleaned the embossing folder with StazOn All-Purpose Stamp Cleaner. Next, I sprayed the panel with Tim Holtz Decayed Distress Mica Stain.  This gave it a green tinge with a hint of sparkle.  I decided to seal the card panel by dipping a foam blending pad into Distress Micro Glaze and dabbing this onto the card panel.  I glued a black cardstock matte behind the embossed panel and adhered it to a white card base. For the sentiment, I used the &qu

Tim Holtz Spencer Halloween Card

I can't get enough of Tim Holtz's Colorize Spencer die set.  The detail and dimension of this image is absolutely amazing.  Today's card features Spencer, 3-D embossing folders, and a few other Tim Holtz Halloween dies sets. The main card panel was made by embossing a piece of silver foil cardstock using the Sizzix 3-D Textured Impressions Pinwheel embossing folder.  I watered down a few drops of black acrylic paint and used a paint brush to brush the paint onto the embossed panel.  I let the paint dry for about a minute and then took a paper towel to rub off the excess paint.  I adhered this panel to a black card base. The smaller card panel was made by embossing a piece of black cardstock with the Tim Holtz Sizzix 3-D Texture Fades Mini Cobblestone embossing folder.  I added a few drops of Sterling Distress Foundry Wax to a craft mat and used my finger to apply the Foundry Wax to the embossed panel.  I added a black matte behind this embossed panel and adhered it at an an

First Day of School

Today's layout was inspired by @christys_beautiful_life 30 Days of Sketches Round 8, Day 3.  I decided to focus the layout on a photo of this year's first day of school. The layout has several sketched circles.  I decided to break out the sewing machine and sew a few black circles using a variety of stitches.   The Scraptember challenge combined with this sketch was layering. So I grabbed the Simple Stories Smarty Pants collection and layered up a bunch of the branding strips and the patterned papers found on the journaling cards. I used the letter stickers from the collection to create the title.  I also used some of the stickers to embellish the title and photo, and also to create an embellishment cluster in the upper right corner of the layout.  To finish off the layout, I splattered it with black ink. I love the 30 Days of Sketches because it is a great way to use up older collections and challenges me to utilize techniques that I don't often use in my layouts. First Da