
Merch

Today's layout features Distress Oxide Paints and is featured around my kids and their sweatshirts from their favorite YouTubers.  They both received their sweatshirts in the mail this week and couldn't wait to wear them.
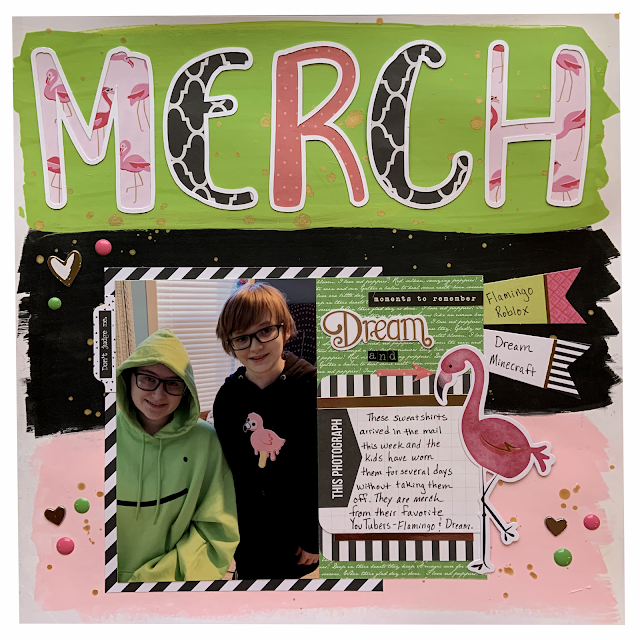
I wanted to create a painted background.  I knew that Twisted Citron, Spun Sugar, and Black Soot Distress Oxide paints would match the color of their sweatshirts perfectly and provide the bold stripes that I wanted for my background.  I used white gesso to cover the back of a 12X12 heavy-weight white cardstock insert from a Heidi Swapp Storyline album page protector.  I used a wide paintbrush to brush a bold horizontal stripe of each of the paint colors.  I used Heidi Swapp's Gold Color Shine to add paint splatters to the painted background.


For the title, I downloaded the Blue Bird font from dafont.com and I used my Cricut machine to cut the word MERCH.  I only used the outline of the title and backed each letter with papers that coordinated with the paint colors.  I was excited to use a flamingo print paper from my stash to coordinate with my son's Flamingo sweatshirt.  I placed the title across the green stripe of paint near the top of the page.


I used pink and green enamel dots and gold cardstock heart stickers to embellish around the photo.  I used a couple of Project Life cards for my journaling block.  I used a variety of embellishments and stickers from my stash that coordinated well with the colors and theme of the layout.  


I was excited to create a bold layout to preserve my kids' obsession with merchandise from their favorite streamers.

Merch
Supplies:
  • 12x12 Heidi Swapp Storyline Page Protector Refill Page
  • Art Basics Finnabair Heavy White Gesso
  • Tim Holtz Distress Paints - Twisted Citron Spun Sugar, and Black Soot
  • Heidi Swapp Gold Color Shine
  • Best of Jen Hadfield Home + Made Paper Pad
  • American Crafts (2018) Wild Card Damask Love - Flockstar
  • Little Yellow Bicycle (2013) - Poppy (green with the white script)
  • Recollections Gold Foil Cardstock
  • Project Life Core Kit Midnight Edition
  • Blue Bird Font by Shiddiq Art https://www.dafont.com/blue-bird.font
  • Fancy Pants Hello Sunshine Tags & Labels
  • Paper Studio Enamel Dots - Pink and Green
  • Thickers Foil Chipboard Stickers - Collect
  • Pink Paislee Turn the Page Stickers
  • Crate Paper Maggie Holmes Flourish Stickers
  • Tim Holtz idea-ology Small Talk Snarky Stickers
  • Creative Devotion Alphabet Stickers

Comments

Popular posts from this blog

Ready Player One

Today's card is a fun virtual reality birthday card created in Cricut Design Space and features a vibrant title backed by an alcohol inked panel. A couple of years ago, my son and I read the book Ready Player One,  a science fiction book about humanity's use of virtual reality to escape the real world. Fast forward a few years and now he wants his own virtual reality headset for his birthday.  I created this card for him to celebrate our love for this book and to serve as a precursor of the birthday gift that was to come. While creating this card, I wore the movie T-Shirt I bought last year so I could mimic the movie title font and colors.  I needed an easy way to make the title out of rainbow colors so I placed a few colors of alcohol ink on a felt pad and swiped it across Yupo Paper.  I downloaded and installed the font used for the movie title and cut the title out of a black A2 card panel using Cricut Design Space.  I backed the black card panel with th...

Hero Arts Citrus Cards

Today I had fun playing with the Hero Arts Fresh Citrus Bold Prints background stamp and the Hero Arts Zest Wishes Stamp Set to create these fun and fresh set of cards. I started by creating the backgrounds.  I used white cardstock and stamped it with the background stamp using VersaMark Ink.  I heat embossed the panels with white embossing powder.  Then, I used a foam blending tool and blended Scattered Straw, Squeezed Lemonade, and Twisted Citron Tim Holtz Distress Oxide Inks to ink the card panels.  For some panels, I used only one ink and other panels I used a combination of all the inks.  I cut the inked backgrounds down to 4" x 5.25" and matte each panel on a black card base.   For one card, I used the excess strips from when I cut down the inked panels, and adhered these strips to a black card panel, leaving a little of the black background showing in between each of the strips. I stamped all the citrus fruits, leaves, flowers, and branches on w...

Tim Holtz Spencer Halloween Card

I can't get enough of Tim Holtz's Colorize Spencer die set.  The detail and dimension of this image is absolutely amazing.  Today's card features Spencer, 3-D embossing folders, and a few other Tim Holtz Halloween dies sets. The main card panel was made by embossing a piece of silver foil cardstock using the Sizzix 3-D Textured Impressions Pinwheel embossing folder.  I watered down a few drops of black acrylic paint and used a paint brush to brush the paint onto the embossed panel.  I let the paint dry for about a minute and then took a paper towel to rub off the excess paint.  I adhered this panel to a black card base. The smaller card panel was made by embossing a piece of black cardstock with the Tim Holtz Sizzix 3-D Texture Fades Mini Cobblestone embossing folder.  I added a few drops of Sterling Distress Foundry Wax to a craft mat and used my finger to apply the Foundry Wax to the embossed panel.  I added a black matte behind this emboss...