
Hello Spring

Today's card features a little mixed media along with the Spellbinders Fancy Edged Ovals and 24 Carrot die sets.  The weather is still cold and gloomy so I felt the need to bring on spring.

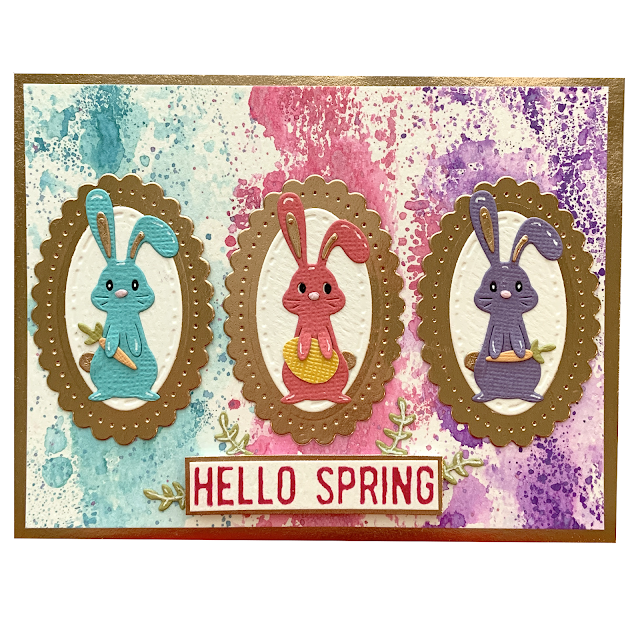
I started by ink smooshing three Distress Oxide inks onto a panel of watercolor cardstock.  I also added water to the inks and used a paintbrush to splatter each of the inks onto the panel.  I cut down the panel and adhered it to an A2-sized panel of rose gold foil cardstock.

I used the smallest scalloped oval from the Spellbinders Fancy Edged Ovals dies set to cut out 3 ovals from rose gold foil cardstock.  I also used the smallest stitched oval to cut three ovals from watercolor cardstock.  I centered the stitched watercolor oval onto the scalloped oval and glued them in horizontal alignment across the center of the watercolor panel.


I used the Spellbinders 24 Carrot die set to cut three bunnies from scraps of blue, pink, and purple cardstock.  I used scraps of cardstock to cut the rest of the pieces of the bunny, two carrots, and some foliage.  I paper pieced the bunnies together and glued each one to the center of the die-cut ovals matching them up with their corresponding colors on the watercolor panel.  I fussy cut an egg out of yellow cardstock and placed the carrots and egg under each of the bunnies' paws.


I used Picked Raspberry Distress Oxide ink to stamp the sentiment onto watercolor cardstock.  I matte the sentiment in rose gold foil cardstock.  I adhered the sentiment at the bottom center of the card using foam tape.  I glued some of the green foliage around the sentiment.  I used a white gel pen to add highlights to the bunnies and green foliage.


I love the combination of the mixed media with the oval die cuts.  This card is a perfect way to say goodbye to winter and hello to spring.


Hello Spring
Supplies:
  • Master's Touch Cold Press Water Color Paper
  • Recollections Rose Gold Foil Cardstock
  • Spellbinders Fancy Edged Ovals
  • Spellbinders March 2020 Small Die of the Month - 24 Carrot
  • Tim Holtz Distress Oxide Inks - Picked Raspberry, Wilted Violet, and Broken China
  • Paintbrush
  • Tim Holtz Distress Ink - Picked Raspberry
  • Stampers Anonymous Tim Holtz Cling Mount Stamps - Spring Shadows

Comments

Popular posts from this blog

Tim Holtz Spencer Halloween Card

I can't get enough of Tim Holtz's Colorize Spencer die set.  The detail and dimension of this image is absolutely amazing.  Today's card features Spencer, 3-D embossing folders, and a few other Tim Holtz Halloween dies sets. The main card panel was made by embossing a piece of silver foil cardstock using the Sizzix 3-D Textured Impressions Pinwheel embossing folder.  I watered down a few drops of black acrylic paint and used a paint brush to brush the paint onto the embossed panel.  I let the paint dry for about a minute and then took a paper towel to rub off the excess paint.  I adhered this panel to a black card base. The smaller card panel was made by embossing a piece of black cardstock with the Tim Holtz Sizzix 3-D Texture Fades Mini Cobblestone embossing folder.  I added a few drops of Sterling Distress Foundry Wax to a craft mat and used my finger to apply the Foundry Wax to the embossed panel.  I added a black matte behind this emboss...

Hello Spring 2022

I love making spring cards.  I get so excited to mix and match the many die sets I have accumulated throughout the year.  Today's cards feature die cut shapes from a variety of die sets.  I created both a vertical and horizontal card layout, changing out the focal image on each of the cards. I started by cutting one of the Sizzix Creative Background dies from the side of a white card panel.  I trimmed a little off each edge and layered it onto a pink cardstock panel.  I cut some grass from light green cardstock using the the grass die from the Spellbinders March 2021 Large Die of the Month Set.  Using the same die set, I cut the sentiment "Hello Spring" from lavender cardstock. You can't have a spring card without lots of flowers, so I scavenged through my scraps of paper to find colors that would coordinate well together.  I used multiple Sizzix Thinlits die sets to cut flowers, foliage, and branches from the scraps of colored cardstock.  I also ...

#HAILTHESAIL

Today's layout was inspired by Day 1of @christys_beautiful_life 30 Days of Sketches Series 8.  Today's triangular sketch was created by Laura Whitaker.  The Scraptember challenge for this sketch was stitching.   As soon as I saw the triangle on this layout, I knew I wanted to use a sailboat to document my daughter's new student orientation day at her college by the sea.  I used my Cricut machine to cut a large sailboat out of a piece of blue whitewashed cardstock.  After losing a time-consuming battle with my sewing machine, I was able to get some blue stitches around the edges of the sailboat.  I glued the sailboat to the blue star paper from Vicki Boutin's Color Study collection.   I used the blue and white striped paper from the Color Study collection to create the large banner.  I inked the edges of the banner with Black Soot Distress ink.  I matte the banner with a small strip of the black script paper from the 6x8 paper p...