
Just Floating By

Today's flat shaker card features the "Make Yourself at Home" Cardmaking Kit for August 2021, a HeroArts Kit that is a Joann.com exclusive. This is the second card I have made from this fantastic card kit.  I combined the kit with the flat shaker card technique inspired by @amyrysavy.


To create the background I used the Hero Arts blending brush included in the kit to blend the four reactive inks onto white cardstock.


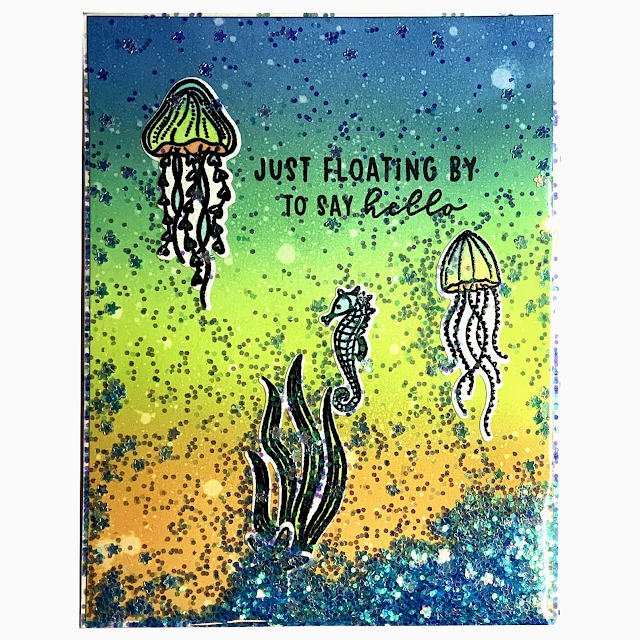
I used Versamark ink to stamp the images from the Need a Hand stamp set.  I embossed the stamped images with black embossing powder.  To color the ocean creatures and sea weed, I smeared the reactive inks onto a craft mat and used a water brush pen to watercolor the embossed images. I used the coordinating dies to cut out the stamped images.


I used liquid glue to adhere the stamped images to the ink blended background.  I used Versafine Onyx Black ink to stamp the sentiment onto the background.


To create the flat shaker element of the card,  I wrapped the card panel using a piece of plastic packaging and adhered the packing to the back of the card panel using double-sided adhesive.  Before adhering the plastic to the top of the card, I shook turquoise glitter and iridescent star glitter down the front of the card.  I used double-sided tape to adhere the panel to a white card base.


This card combines one of my favorite techniques - using up my supplies :)  Start saving and reusing that plastic packaging and take a chunk out of your glitter stash by creating some flat shaker cards.  Can't wait to see what you create!


Just Floating By
Supplies:
  • Amy Rysavy's Youtube Tutorial - https://youtu.be/1MxZ1EoWmf8
  • Accent Opaque White Cardstock 100lb
  • Reactive Ink Cubes - Creamsicle, Key Lime, Pool Party, Blue Hawaii
  • Hero Arts Ink Blending Brush
  • VersFine Onyx Black Ink
  • VersaMark
  • Recollections Ebony Detailed Embossing Powder
  • Hero Arts Need a Hand Stamp Set
  • Hero Arts Need a Hand Frame Cuts Die Set
  • Ranger Tim Holtz Water Brush Pen
  • Art Glitter Glue
  • Plastic Packaging
  • Double-Sided Tape
  • Recollections Memory Explosion Box Assorted Glitter Set

Comments

Popular posts from this blog

Tim Holtz Spencer Halloween Card

I can't get enough of Tim Holtz's Colorize Spencer die set.  The detail and dimension of this image is absolutely amazing.  Today's card features Spencer, 3-D embossing folders, and a few other Tim Holtz Halloween dies sets. The main card panel was made by embossing a piece of silver foil cardstock using the Sizzix 3-D Textured Impressions Pinwheel embossing folder.  I watered down a few drops of black acrylic paint and used a paint brush to brush the paint onto the embossed panel.  I let the paint dry for about a minute and then took a paper towel to rub off the excess paint.  I adhered this panel to a black card base. The smaller card panel was made by embossing a piece of black cardstock with the Tim Holtz Sizzix 3-D Texture Fades Mini Cobblestone embossing folder.  I added a few drops of Sterling Distress Foundry Wax to a craft mat and used my finger to apply the Foundry Wax to the embossed panel.  I added a black matte behind this emboss...

#HAILTHESAIL

Today's layout was inspired by Day 1of @christys_beautiful_life 30 Days of Sketches Series 8.  Today's triangular sketch was created by Laura Whitaker.  The Scraptember challenge for this sketch was stitching.   As soon as I saw the triangle on this layout, I knew I wanted to use a sailboat to document my daughter's new student orientation day at her college by the sea.  I used my Cricut machine to cut a large sailboat out of a piece of blue whitewashed cardstock.  After losing a time-consuming battle with my sewing machine, I was able to get some blue stitches around the edges of the sailboat.  I glued the sailboat to the blue star paper from Vicki Boutin's Color Study collection.   I used the blue and white striped paper from the Color Study collection to create the large banner.  I inked the edges of the banner with Black Soot Distress ink.  I matte the banner with a small strip of the black script paper from the 6x8 paper p...

Pumpkin Picking

Today's fun Halloween card features the Tim Holtz Colorize Pumpkinhead Colorize die set and Distress Mica Stains. I started by spraying a water color panel with Hocus Pocus, Jack-O-Lantern, and Empty Tomb Halloween Distress Mica Stains.  For the moon, I die cut a circle out of water color paper. I ink smooshed Antique Linen and Weathered Wood Distress Oxide Inks onto a craft mat and sprayed them with water.  I pushed the circle into the inks and dabbed off the excess ink and water with a paper towel.  I inked the edges of the moon with Black Soot Distress Oxide Ink.  I adhered the moon to the water color panel and added a black bat to the top of the moon. Next, I die cut several trees, bats, and fences out of black cardstock.  I also die cut a couple of fences from silver foil cardstock.  I adhered the trees to both sides of the card panel.  I slightly offset the silver foiled fence from the black fence and adhered the fence pieces to the bottom of the...