
Today's Halloween card features a variety of Tim Holtz products. I recently purchased a set of Tim Holtz embossing glazes and couldn't wait to use them to create a brick background.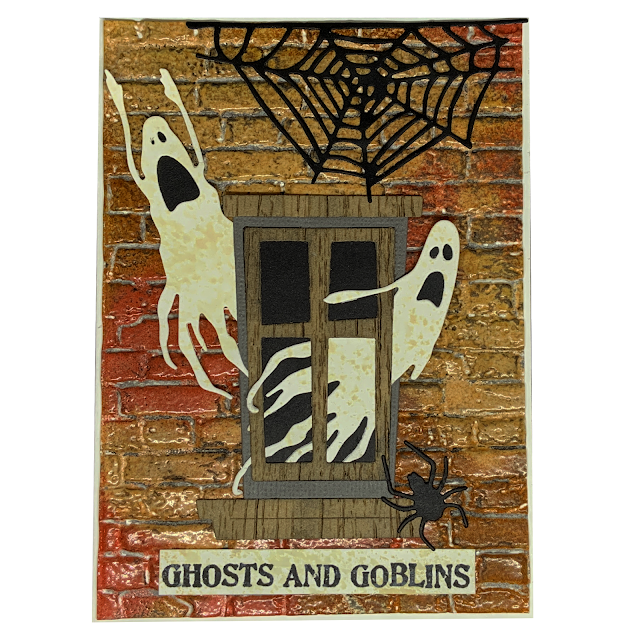


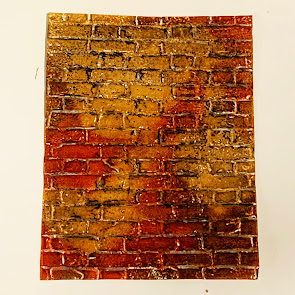


To create the brick background, I started by spraying water on the front and back of a piece of watercolor paper. I placed the paper inside the Tim Holtz Sizzix 3-D Brickwork Texture Fades embossing folder and ran it through my die-cut machine. I swiped my VersaMark ink pad over the brick embossed background. I sprinkled Fired Brick Tim Holtz Distress Embossing Glaze in a few random places on the background panel. I shook off the excess powder and repeated the process with Rusty Hinge and Tattered Rose embossing glazes. I heat embossed the entire panel.
This created a beautiful shiny brick background, but I wanted it to have more of a distressed look.
I took a black art crayon and scribbled it across a piece of plastic. I used my finger to transfer the art crayon to the brick panel. I rubbed the art crayon across the bricks which helped to age the brick and bring out more embossed details. I added water to the art crayon on the piece of plastic and used a paintbrush to watercolor in between the lines of the brick to age the brick mortar.
I trimmed down the edges of the brick panel and inked it with Black Soot Distress ink. I adhered the brick panel to an ivory card base. I also inked the edges of the card base with Black Soot Distress ink.
I used the Tim Holtz Window Frame die to cut the pieces of the window. I wanted to give the window frame a wood-grain appearance, so I inked the inside of the Tim Holtz Lumber 3-D embossing folder with Walnut Stain Distress Ink and placed the Kraft cardstock window frame pieces inside the folder. I ran the folder through my die cut machine so that the walnut stain ink made an impression into the window frame pieces. I inked the edges of the pieces with the same color ink.
I die-cut a spider and spider web from black cardstock. I die-cut the ghosts from white cardstock and splattered them with a mixture of water and Antique Linen Distress Oxide ink. I cut small pieces of black cardstock to place behind the ghosts' eyes and mouth. I glued the spider web to the top of the brick background panel. I assembled the window frame placing one ghost behind the window and the other as if it was coming out from inside the window. After the window and the ghosts were adhered to the brick background, I glued the spider near the bottom of the window. I added a bit of sparkle to the spider and spiderweb using a Wink of Stella clear glitter brush pen.
For the sentiment, I used a Recollections Halloween sentiment and used black ink to stamp it onto white strip of cardstock. I splattered the sentiment strip with a mixture of water and Antique Linen and and inked the edges with Black Soot Distress ink. The sentiment was adhered underneath the window frame.
For the inside of the card, I die-cut a black stitched oval and two bats. I adhered a ghost to the center of the oval and glued this to the inside of the card. I glued the bats outside the oval in opposite corners of the inside of the card. I used a Recollections Halloween rubber stamp sentiment and stamped the sentiment in black ink onto a white cardstock strip. I embossed the entire sentiment strip with Tattered Rose embossing glaze. The sentiment was glued across the center of the stitched oval on top of the ghost.
I had fun using a variety of Tim Holtz products to create this card. My favorite part is the brick embossed panel with the embossing glazes. I love feeling the texture of the embossed brickwork background.
Ghosts and Goblins
Supplies:
Supplies:
- Value Pack Cards & Envelopes by Recollections® - Ivory
- Recollections Cardstock - kraft, white, and black
- Artist's Loft Cold Press Watercolor Paper
- VersaMark Watermark Stamp Pad
- Tim Holtz Sizzix 3-D Texture Fades - Brickwork
- Tim Holtz Sizzix 3-D Texture Fades - Lumber
- Tim Holtz Sizzix Thinlits - Frightful Things
- Tim Holtz Sizzix Thinlits - Hocus Pocus
- Tim Holtz Sizzix Bigz Die - Window Frame
- Tim Holtz Distress Embossing Glaze - Fired Brick, Rusty Hinge, and Tattered Rose
- Tim Holtz Distress Ink - Black Soot and Walnut Stain
- Tim Holtz Distress Oxide Ink - Antique Linen
- Vicki Boutin Art Crayon - Black
- Paint Brush
- Wink of Stella Clear Glitter Brush Pen
- Spellbinders Fancy Edged Ovals Templates
- Recollections Wood Stamp - Happy Halloween
- Recollections Halloween Greetings Stamps - Ghosts and Goblins
Comments
Post a Comment