
Pumpkin Picking

Today's fun Halloween card features the Tim Holtz Colorize Pumpkinhead Colorize die set and Distress Mica Stains.
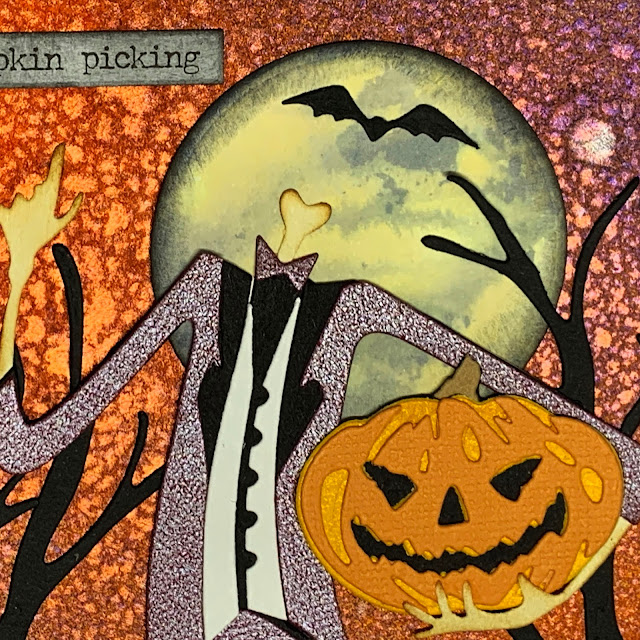
I started by spraying a water color panel with Hocus Pocus, Jack-O-Lantern, and Empty Tomb Halloween Distress Mica Stains.  For the moon, I die cut a circle out of water color paper. I ink smooshed Antique Linen and Weathered Wood Distress Oxide Inks onto a craft mat and sprayed them with water.  I pushed the circle into the inks and dabbed off the excess ink and water with a paper towel.  I inked the edges of the moon with Black Soot Distress Oxide Ink.  I adhered the moon to the water color panel and added a black bat to the top of the moon.


Next, I die cut several trees, bats, and fences out of black cardstock.  I also die cut a couple of fences from silver foil cardstock.  I adhered the trees to both sides of the card panel.  I slightly offset the silver foiled fence from the black fence and adhered the fence pieces to the bottom of the card. 


I used a variety of cardstock colors to create the pumpkin and Pumpkinhead figure.  I placed the pumpkin into Pumpkinhead's arm.  I used Vintage Photo Distress Oxide Ink to ink Pumpkinhead's arms and bone.  I glued Pumpkinhead to the center of the watercolor panel.  To finish off the card, I added the very fitting "pumpkin picking" sentiment to the top left of the watercolor panel.


I added the watercolor panel to a black cardstock panel.  This was glued to a white card base.  On the inside of the card, I die cut a border shape from silver foil cardstock.  I used StazOn Jet Black ink to stamp the sentiment in the center of the shape.  I added two bats on opposite corners of the sentiment.


This was such a fun card to make.  The "pumpkin picking" label was the perfect sentiment for the Pumpkinhead character.


Pumpkin Picking
Supplies:
  • Accent Opaque White Cardstock 100lb
  • Recollections Cardstock - black, white, cream, and silver foil
  • Strathmore Cold Press Water Color Paper
  • Bazzil Bling Cardstock - Royalty
  • Tim Holtz Ranger Distress Mica Stains - Empty Tomb, Hocus Pocus, and Jack-O-Lantern
  • Colorize by Tim Holtz Sizzix Thinlits - Pumpkinhead
  • Tim Holtz Sizzix Halloween 2021 Thinlits Dies Vault Series
  • Tim Holtz Sizzix Thinlits - Toil and Trouble
  • Tim Holtz idea-ology Small Talk - Occasions
  • Tim Holtz Stamper's Anonymous Monstrous (sentiment)
  • Elizabeth Craft - The Woods 1 die set
  • Distress Oxide Ink - Vintage Photo, Black Soot, Antique Linen, and Weathered Wood
  • StazOn Jet Black ink

Comments

Popular posts from this blog

Tim Holtz Spencer Halloween Card

I can't get enough of Tim Holtz's Colorize Spencer die set.  The detail and dimension of this image is absolutely amazing.  Today's card features Spencer, 3-D embossing folders, and a few other Tim Holtz Halloween dies sets. The main card panel was made by embossing a piece of silver foil cardstock using the Sizzix 3-D Textured Impressions Pinwheel embossing folder.  I watered down a few drops of black acrylic paint and used a paint brush to brush the paint onto the embossed panel.  I let the paint dry for about a minute and then took a paper towel to rub off the excess paint.  I adhered this panel to a black card base. The smaller card panel was made by embossing a piece of black cardstock with the Tim Holtz Sizzix 3-D Texture Fades Mini Cobblestone embossing folder.  I added a few drops of Sterling Distress Foundry Wax to a craft mat and used my finger to apply the Foundry Wax to the embossed panel.  I added a black matte behind this emboss...

Ready Player One

Today's card is a fun virtual reality birthday card created in Cricut Design Space and features a vibrant title backed by an alcohol inked panel. A couple of years ago, my son and I read the book Ready Player One,  a science fiction book about humanity's use of virtual reality to escape the real world. Fast forward a few years and now he wants his own virtual reality headset for his birthday.  I created this card for him to celebrate our love for this book and to serve as a precursor of the birthday gift that was to come. While creating this card, I wore the movie T-Shirt I bought last year so I could mimic the movie title font and colors.  I needed an easy way to make the title out of rainbow colors so I placed a few colors of alcohol ink on a felt pad and swiped it across Yupo Paper.  I downloaded and installed the font used for the movie title and cut the title out of a black A2 card panel using Cricut Design Space.  I backed the black card panel with th...

Hero Arts Citrus Cards

Today I had fun playing with the Hero Arts Fresh Citrus Bold Prints background stamp and the Hero Arts Zest Wishes Stamp Set to create these fun and fresh set of cards. I started by creating the backgrounds.  I used white cardstock and stamped it with the background stamp using VersaMark Ink.  I heat embossed the panels with white embossing powder.  Then, I used a foam blending tool and blended Scattered Straw, Squeezed Lemonade, and Twisted Citron Tim Holtz Distress Oxide Inks to ink the card panels.  For some panels, I used only one ink and other panels I used a combination of all the inks.  I cut the inked backgrounds down to 4" x 5.25" and matte each panel on a black card base.   For one card, I used the excess strips from when I cut down the inked panels, and adhered these strips to a black card panel, leaving a little of the black background showing in between each of the strips. I stamped all the citrus fruits, leaves, flowers, and branches on w...