
St. Patrick's Day Retro Oven

Today's St. Patrick's Day card features the Retro Oven die by Tim Holtz.  I just recently purchased this die along with some other products and wanted to combine them all into a holiday card.


I started by assembling the oven using scraps of paper from my stash. The oven door was covered with a small piece of acetate.  I also cut the outline of the oven from 5 mm foam and adhered this behind the oven to create a shaker element.  I cut small shamrocks out of green foil cardstock using my Cricut machine and combined these with light green sequence to make the shaker material inside the oven.


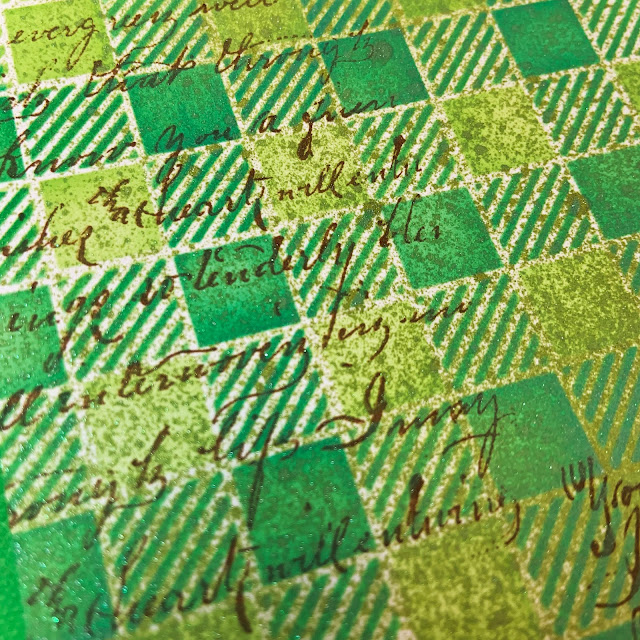
To create the card background, I started by inking a script stamp with Coffee Archival Ink and stamping it at the top and bottom of the card panel.  Then, I used a make-up blending brush to apply Mowed Lawn Distress Oxide through a gingham stencil onto the card panel.  I shifted the stencil and then repeated the process using Lucky Clover Distress Oxide.  Finally, I sprayed the panel with Bubbling Cauldron Distress Mica Stain.  I trimmed down the card panel and adhered the oven shaker to the center of it. I glued the card panel to a green card base.


On the inside of the card, I stamped the sentiment "Happy St. Patrick's Day".  I stamped two shamrocks using Versafine ink and embossed them using Lime Tinsel embossing powder.  I fussy cut around the shamrocks and adhered them around the sentiment.


The Retro Oven is such a versatile die and the background of this card was stunning.  I can't wait to use this combination again to bake up some spring cards.


St. Patrick's Day Retro Oven
Supplies:
  • Accent Opaque White Cardstock 100lb
  • Recollections Green Foil and Matte Silver Metallic Cardstock
  • Tim Holtz Sizzix Retro Oven Thinlits
  • Cricut - Clover Band #M7F34CA5
  • Light Green Sequence
  • Acetate
  • 5mm Foam
  • Archival Ink - Coffee
  • Stampendous Fran's Cling Rubber Stamps - Cling Vintage Note
  • Simple Stories Stencil - Gingham
  • Make-up Blending Brush
  • Distress Oxide Inks - Mowed Lawn and Lucky Clover
  • Tim Holtz Ranger Distress Mica Stain - Bubbling Cauldron
  • Hero Arts 4x6 Clear Stamp #CL498
  • Versafine Onyx Black Ink
  • Ranger Embossing Powder - Lime Tinsel
  • Stampabilities Rubber Stamp - Four Leaf Clover

Comments

Post a Comment

Popular posts from this blog

Tim Holtz Spencer Halloween Card

I can't get enough of Tim Holtz's Colorize Spencer die set.  The detail and dimension of this image is absolutely amazing.  Today's card features Spencer, 3-D embossing folders, and a few other Tim Holtz Halloween dies sets. The main card panel was made by embossing a piece of silver foil cardstock using the Sizzix 3-D Textured Impressions Pinwheel embossing folder.  I watered down a few drops of black acrylic paint and used a paint brush to brush the paint onto the embossed panel.  I let the paint dry for about a minute and then took a paper towel to rub off the excess paint.  I adhered this panel to a black card base. The smaller card panel was made by embossing a piece of black cardstock with the Tim Holtz Sizzix 3-D Texture Fades Mini Cobblestone embossing folder.  I added a few drops of Sterling Distress Foundry Wax to a craft mat and used my finger to apply the Foundry Wax to the embossed panel.  I added a black matte behind this emboss...

I'd Cross the Ocean For You

I just received the Seas the Day stamp set by Dare 2B Artzy and I couldn't wait to use the images and sentiments to make some ocean-themed cards.   I started out by stamping the manatee and shells and colored them with Copic markers.  For the card front, I used Pixie Spray on the back of a mermaid scales stencil and adhered it to a piece of Bristol smooth cardstock.  I blended 3 colors of blue Distress Oxide Inks to make it look like the ocean water was getting lighter near the surface.  To add a little bit of sparkle to the water, I splattered some glitter ink on the stenciled card front. I decided to make this a shaker card, so I used a scallop square die to cut a window out of the center of the card front.  A piece of acetate was glued to the back of this window.  I blended Tumbled Glass Distress Oxide Ink on the white card base.  A sequence mixture was made using blue, white, and iridescent sequence.  I glued a few of the sequence pieces ...

Hero Arts Citrus Cards

Today I had fun playing with the Hero Arts Fresh Citrus Bold Prints background stamp and the Hero Arts Zest Wishes Stamp Set to create these fun and fresh set of cards. I started by creating the backgrounds.  I used white cardstock and stamped it with the background stamp using VersaMark Ink.  I heat embossed the panels with white embossing powder.  Then, I used a foam blending tool and blended Scattered Straw, Squeezed Lemonade, and Twisted Citron Tim Holtz Distress Oxide Inks to ink the card panels.  For some panels, I used only one ink and other panels I used a combination of all the inks.  I cut the inked backgrounds down to 4" x 5.25" and matte each panel on a black card base.   For one card, I used the excess strips from when I cut down the inked panels, and adhered these strips to a black card panel, leaving a little of the black background showing in between each of the strips. I stamped all the citrus fruits, leaves, flowers, and branches on w...